Know How to Fix WSAPPX High Disk Usage Issue on Windows With 5 Easy Methods
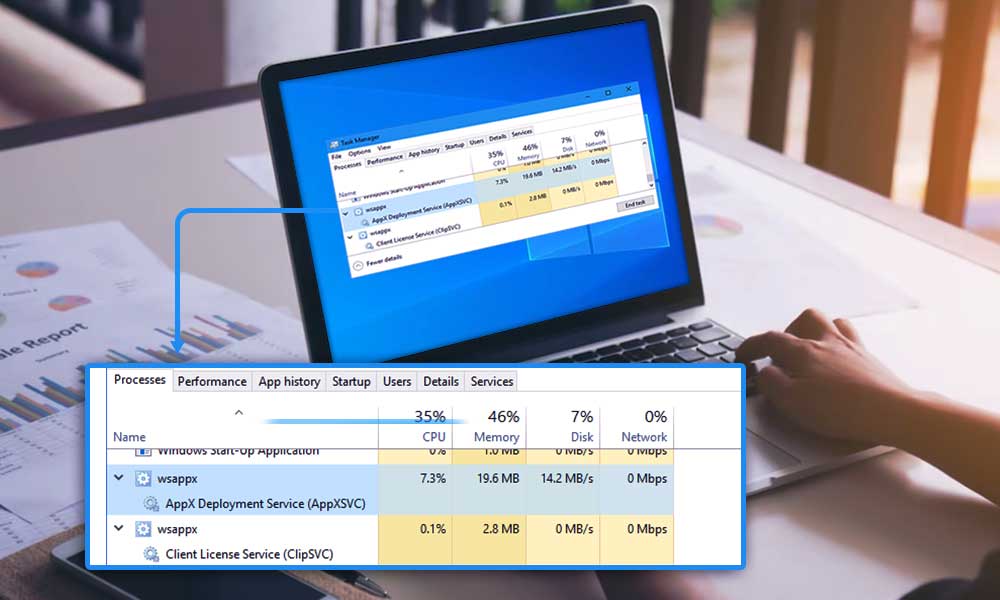
WSAPPX is a process that runs in the background of Windows 8 or Windows 10. It also manages Microsoft’s Universal app store. It is involved in every installation, update, and uninstallation of Windows Store apps. While it is only needed in installation and removal of apps, the program keeps running in the background and occupies internal memory thus causing high disk usage problems, and you receive the error stating “WSAPPX High Disk Usage Issue”
What Can Cause WSAPPX High Disk Usage Issue
In order to fix the wsappx high disk or high CPU usage, you need to understand the cause that is triggering the problem on Windows. here are some of the possible causes:
- You are using Microsoft Store and due to this Wasppx is using CPU and disk memory.
- When you download an app or install an update to pursue the installation of the appm Wsappx is likely to consume more resources.
- While installing traditional desktop software, the installation will consume extra resources such as CPU and disk usage.
- The apps that are automatically updating in the background can use extra resources and cause high disk usage.
As we get to know this issue is quite common and can occur without any prior warning, so we have some useful recovery methods to get rid of high disk usage issues.
How to Control WSAPPX High Disk Usage Issue?
Here are 5 proven methods that will help you fix WSAPPX high dish usage issue on Windows:
Method 1: Increase Virtual Memory
For expanding the virtual memory size, you can do the steps given below:
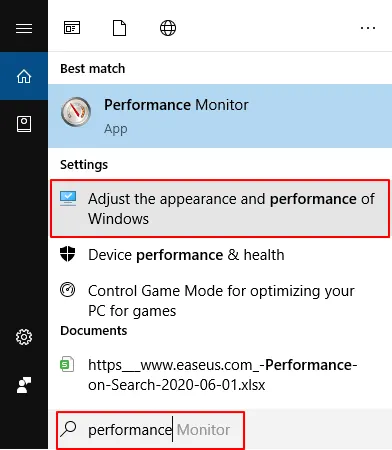
- Open the search bar and type “performance”. Choose the option “Adjust Appearance vs. Performance of Windows.”
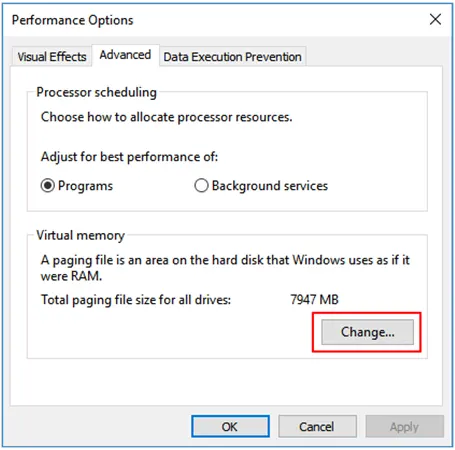
- Choose “Advanced” from the tabs option, go to “Virtual memory” and click “change”.
- Uncheck the checkbox named “Automatically manage paging file size for all drives” and choose the drive where you have installed the OS and choose “Custom Size”.
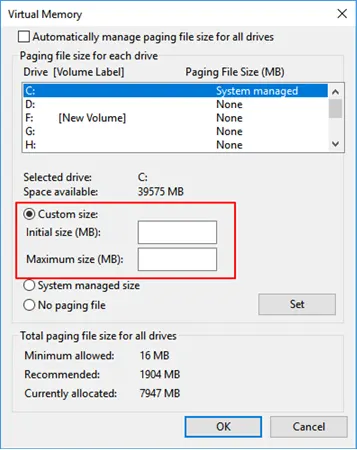
- Now, set the “initial size” exactly the same as the size of your RAM and the “Maximum size” as double of the Initial size.
- Select Set>>OK and then reboot your device.
Method 2: Disable the Windows Store
Disabling the Windows store can be done by using two methods namely: Group Policy Editor and Registry Editor. Both methods are explained here below:
- Using Group Policy editor
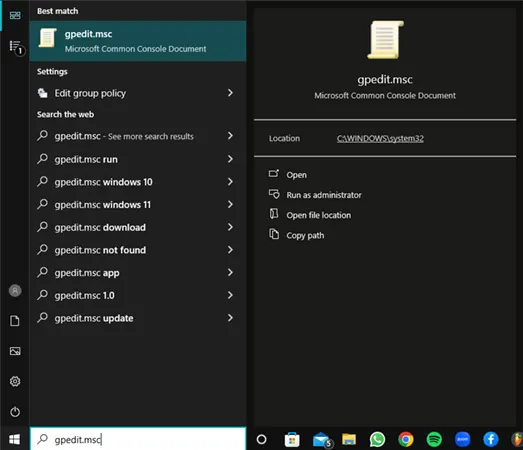
- Type “gpedit.msc”, then click Start Search and then Enter. The Local Group Policy Editor will open.
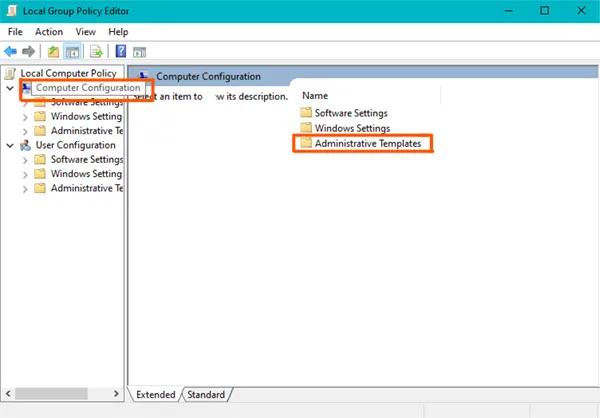
- Access “Computer Configuration” and then choose “administrative templates”.
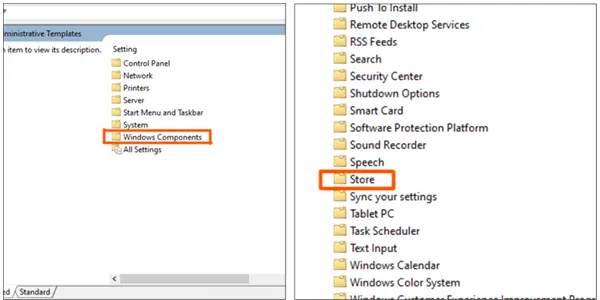
- Open “Windows components” and then select “store”.
- From the right pane select “Turn Off Store application”.

- Select “Enable” and then “Apply” .
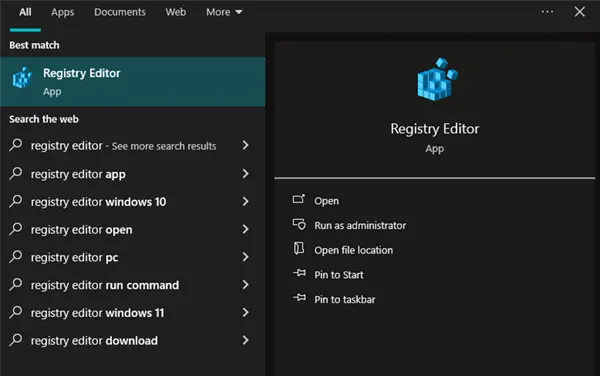
- Using Registry error
If your system doesn’t have the Group Policy Editor, you need to use the Registry Editor. But before that you need to back up the data first:
- In the Start search menu, type ‘Regedit” and hit Enter to open the Registry Editor.
- Open the HKEY_LOCAL_MACHINE\SOFTWARE\Policies\Microsoft\WindowsStore key.
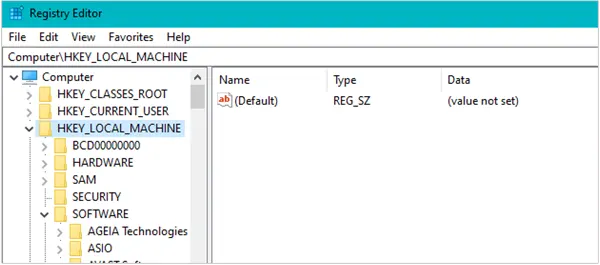
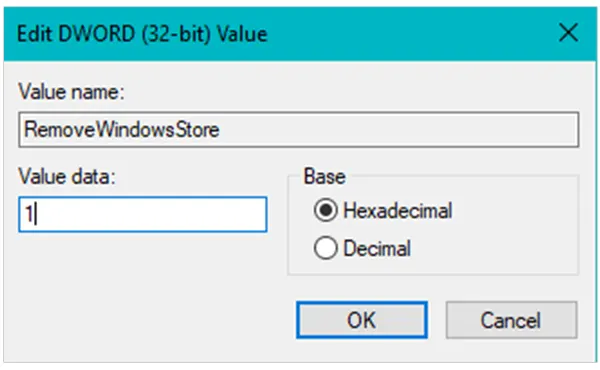
- In this key, you will have to create a new DWORD value within the Store Key and name it as RemoveWindowsStore and give it the “1” value.
- If there is no key available, you need to create it.
After performing this method, you need to restart your device. On disabling the Windows store, you can’t be able to install third-party applications. So, if any attempt is made to install the third-party application, you will receive this message:
“Windows Store isn’t available on this PC. Contact your system administrator for more information.”
Method 3: Check the Disk and Clean the Junk Files
Clean the disk and then remove the junk files by running a strong antivirus. Once every junk file is removed, reboot your system. This way you can clear out some memory on your device, fix the high usage of CPU, and control the mentioned problem.
Method 4: Modify AppXSvc Value in Registry
- First you need to opem the Registry Editor and go to HKEY_LOCAL_MACHINE\SYSTEM\ControlSet001\Services\AppXSvc.
- Now, from the right-hand side menu, change the value to 4 for Start.
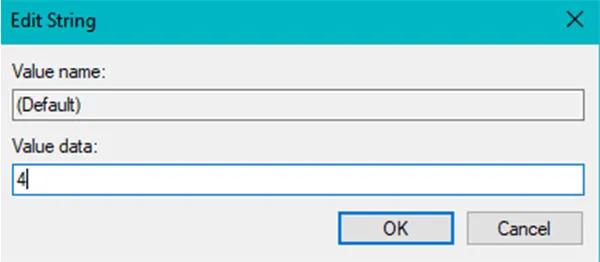
- Restart your device.
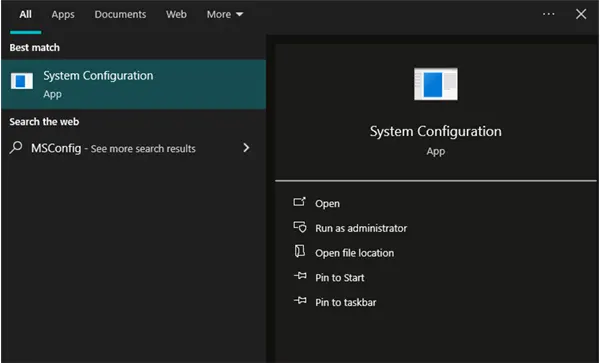
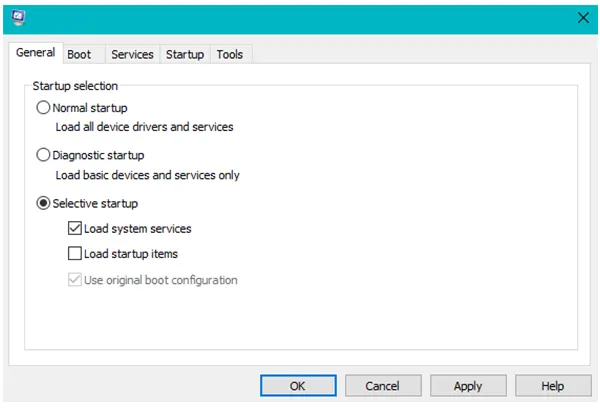
Method 5: Troubleshoot Using the Clean Boot State
If all the methods mentioned above are not helping, you can try fixing the issue by performing a clean boot. In this state, Windows will only run the essential drivers and startup programs. From here, you can fix the startup programs if they are causing the issue.
- Type MSConfig to open System Configuration Utility.
- Go to the “general tab”, click on “selective startup”, and check “load system service” and “use original boot configuration”. Click on “Ok” to continue.
- Go to the Services tab, select “Hide All Microsoft Services” and click “Disable all”. Click “Apply” and “OK” to keep all the changes.
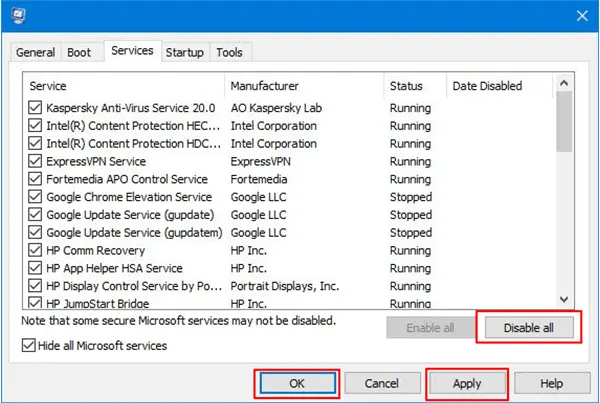
After this you can restart your computer and windows will execute a clean boot
Conclusion
In this article, we have briefly viewed and explained why WXAPPX taking up so much space on your computer. The reasons can be many, but I’m sure the solutions are quite clear.
Hope this article was able to solve your queries and the CPU usage problem won’t occur now.
How do I fix high disk usage on Wsappx?
Methods to fix Wsappx high disk usage issue –
- Method 1 – Scan system
- Method 2 – Run Troubleshoot
- Method 3 – Remove the background apps
- Method 4 – Extend virtual memory
- Method 5 – Clean disk internal error
Why is Wsappx using so much CPU?
Sometimes this may be the effect of some new app that you downloaded. If that’s the case then all you have to do is uninstall the app and restart your system. To properly uninstall the app all you have to do is open the control panel and select programs.
Does RAM affect CPU usage?
RAM can help your processor run more process at the same time. The more RAM you have, the more process your CPU can run.

Education


