How to Transfer Windows OS From HDD to SSD

Q: “My computer’s boot-up speed is too slow, and after browsing the suggestions on the forum, I decided to install Windows OS on an SSD. However, I am a complete layman about this. How do I migrate Windows 11 from HDD to SSD without reinstalling?”
SSD have better operating speed and stability compared to HDDs. When your computer is becoming laggy or crashes frequently, it’s a good idea to migrate its system to a new SSD. Are you a novice? Don’t get frustrated, this article will detail two ways to migrate Windows OS from HDD to SSD, you can easily and quickly accomplish this challenge.
How to Transfer OS From HDD to SSD on Windows 11/10
Implementing a system migration in Windows is not complicated, but you need to pay careful attention to each step in the process to prevent data loss due to migration failure. Before you start, here are the preparations you should make.
1. Backup your system disk data.
2. Connect or install another SSD on your computer. If this SSD is brand new, you need to initialize it and create partitions first.

3. Organize the data on the system disk and delete duplicate and useless files to free up some disk space.
4. Check and make sure the storage capacity of the new SSD is larger than the amount of data on the source disk.
Way 1: Transfer Windows From HDD to SSD with CloneGo
There is no built-in tool dedicated to disk migration in the Windows system. Therefore, for novices, choosing a professional cloning tool can make the task of transferring OS easier and safer.
iSunshare CloneGo is a powerful and user-friendly software specialized in disk/partition cloning, migration, and backup.
With its stability and reliability, this tool has become one of the first choices for many users migrating to Windows operating systems.
Step 1: Go to the iSunshare official website to download and install CloneGo on your Windows PC, then launch it.

Step 2: Click the “Copy” option in the left menu bar, which allows you to migrate Windows OS or other partitions to another hard disk individually. If you want to clone an entire disk, such as cloning an SSD to a larger SSD, then select the “Disk Clone” option.
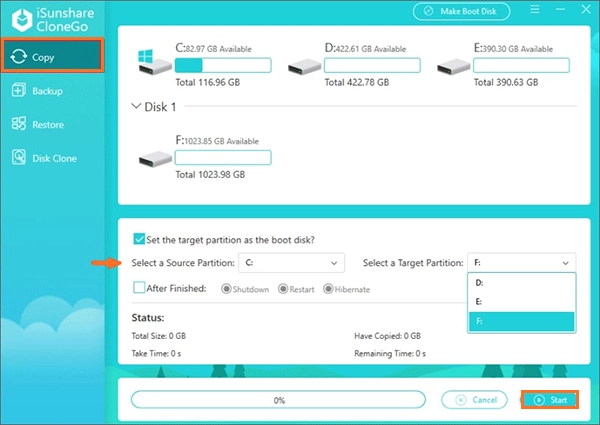
Next, select the source partition (Windows OS), and select SSD as the target partition.
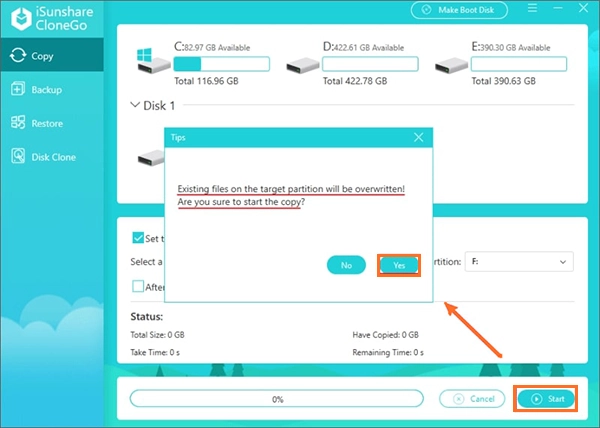
Step 3: Click “Start“, read the warning message, and click “Yes” to confirm the start of Windows OS to SSD migration.
Step 4: Wait patiently for the process to finish, keep your computer on until “The copy completed successfully” message pops up.

Step 5 (Optional): If your computer has more than one card slot and you keep both the old HDD and the new SSD, then you need to enter BIOS to set the SSD as the boot disk, otherwise your computer will continue to boot from the old disk.
Way 2: Transfer Windows OS to SSD with System Image Tool
Microsoft offers a feature in Windows called “System Backup&Restore“, also known as System Image, which can be used to clone an entire disk. With this feature, users can create an image file containing the entire system partition and then restore it to a new hard disk.
Since this feature is not specifically for disk cloning, using a system image for Windows OS migration from HDD to SSD or transfer data to another SSD can be complicated, but it is certainly an option.
Step 1: Create a system image.
- Open the Control Panel option in Windows and select Backup and Restore (Windows 7).
- In the Backup and Restore window, select “Create a System Image“.
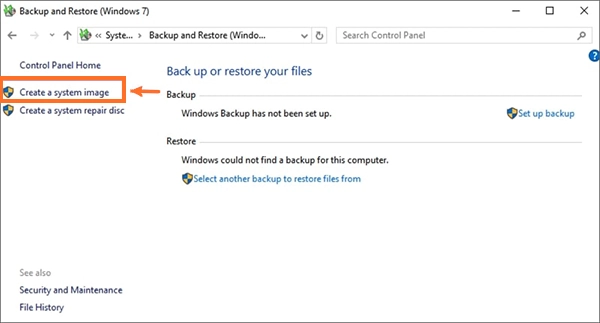
3. Select the disk you want to back up and choose the storage location, then click “Start Backup” to create a system image.
Step 2: Create installation media for Windows.
- Depending on your system, select and download the “Windows Media Creation Tool“.

- Run the tool as administrator, select “Create installation media (USB flash drive, DVD, or ISO file)” and click “Next“.
- Select the desired language, Windows version, and architecture, then select the type of media you want to create and follow the wizard through the process.
Step 3: Recover the system image.
1. Ensure that the new SSD is connected to the computer and successfully recognized.
2. Boot your computer and enter “Recovery Mode“.
3. Select “System Image Recovery” and follow the prompts to select the system image file and target drive to restore, and then start the recovery process.

Conclusion
Migrating Windows OS from HDD to SSD is an effective way to improve your computer’s responsiveness and data reading speed, and this article described two common options to help you complete your computer upgrade. Hope this can help you.

Education


