Facebook Business Page: Create, Manage and Optimize

Facebook is the best place to promote your business and that’s what Facebook Business pages are meant for. All you need is; the details, images and some brilliant quotes to impress your viewers. The next thing that matters is authenticity; if you are genuine and able to satisfy your customers, you must get your Facebook page ready now.
Here are the basic steps that will help you create, organize, and optimize your FB business page like a walk in the garden.
So are you ready to rock in front of the 2.5 Billion active users of Facebook and introduce them to your business? Just go through the steps we have given you and you are all sorted. You can’t get a bigger platform than Facebook to promote your business. Don’t miss the opportunity and be the FB business king with our helpful guide.
Get Set Go!!!!!!
Get Your Facebook Business Page Ready Performing These Steps
Step 1: Sign-up
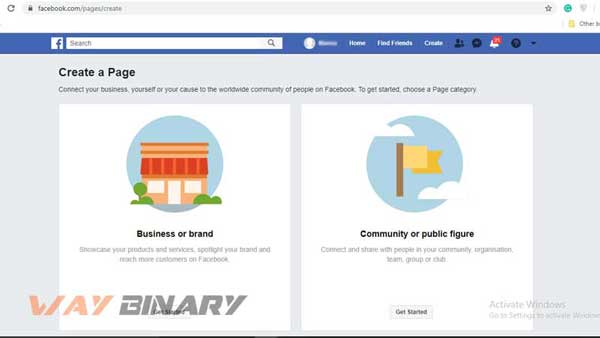
Of course!! To start with, you need a Facebook account, on which you will start your business page. If you already have a FB account, go to https://www.facebook.com/pages/create.
The page mainly consists of two options to get started, first is “Business or Brand” and next is “Community or public figure”. Every option has a “Get started” button, click on the favorable option. To promote your brand or business you must go with the first one i.e. “Business and Brand”
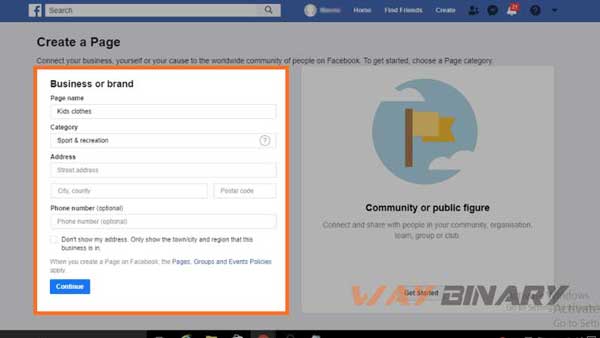
On the next screen, you need to fill the basic information for your business page. First, enter your page name; enter a name that suits your business well and is very searchable. The name of the page should be attractive enough to catch maximum eyeballs.
After the name, you need to select the category for your business. The category determines the nature of your business and thus plays a vital role. For instance, if you are dealing with Clothes, you need to select a “Clothing” or similar option, and not the “design and fashion” . Try to choose a category that is the closest match. While registering, you can only add one category, but more categories can be added later on.

After adding the name and category, the same menu will expand to show you more details such as an address, and phone number. Fill the details properly or keep it for later, and hit the “Continue” button.
Step 2: Add images
The next step is to add images to your Facebook page. The more images you add to your page, the more visually attractive it becomes. Images should be clearly showing the relation with your business and even should convey the brand motive. The aim of adding images is to make your business more identifiable on Facebook.
The Profile picture:
So, you first need to start with the profile picture. Whenever someone searches for your business, this image will appear along with your page name. Just like we add our pictures as our DP’s and profile picture to our accounts so that people can know who this account belongs to, the same implies with the profile pictures of our page. Also, the image will be displayed on the top left corner of your FB page.
The profile picture also plays a vital role in brand promotion. If your business cherishes a big name, you are suggested to keep your logo on the profile picture, this will increase the authenticity of your page. And, this will make it easier for you to gain popularity in a very short period of time. But, if you are a newbie or a local brand, try to design a very appealing profile picture, so that no one can scroll without hitting it. This will even make it very easy and quick to recognize your page from the heap of other similar pages.
You surely don’t want your image to look ill-aligned and thus following the standard parameters is important. FB profile picture follows the measure of 170 x 170 pixels on a desktop and 128 x 128 pixels on mobile- it appears in a circle and thus it is necessary to focus on the center instead of corners. Put the most essential elements in the center so that Facebook doesn’t crop it out.
After selecting the image of your choice, tap on the Upload Profile Picture button:

Then, select the image from the “Files” and save it.
The Cover Image:
After adding the profile picture, Facebook will prompt you to add a cover image for your Facebook page. This will be the most prominent image of your page and determines the outlook of your business page and hence choosing the relevant image is important. It shows as 820 x 312 pixels on desktop or 640 x 360 pixels on mobile, thus it makes you sure to keep an image that has the accurate pixel-measurement. The natural size of the image should be 400 pixels wide and 150 pixels tall, and the recommended size to upload the cover image is 720 x 315 pixels
After selecting a very attractive and relevant image, you are almost done with the representation part, and now it is time to Upload it, by clicking on Upload a Cover Photo and then select from the “Files” from your device.
Ta-da, your cover image is now all set. Let’s now move to the other important aspects that you need to consider while setting up the image.
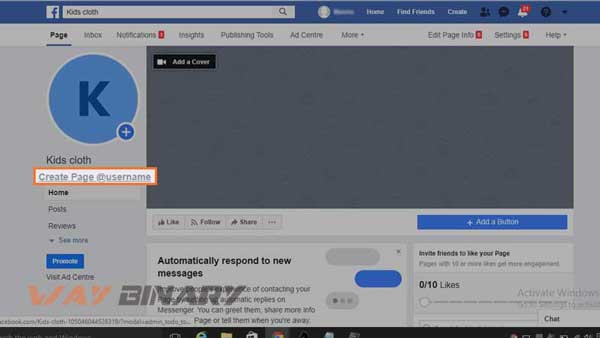
Step 3:- Create a username:
The username that is used to create your vanity URL- your address on your Facebook. Using this, people can find your page.
The username should not exceed the limit of 50 characters. Here is a pro-tip: try to keep the username as compact as possible and don’t go overboard with it. It should be easy to remember and easier to find. You can use your business name in different combinations so that your offline users can also find you on Facebook whenever they need to do so.
Tap on “Create Page @Username” from the left menu. Enter the username and then click on Create username.
If you want a guide to choosing a username of your Facebook business page, go to this FB help page: https://www.facebook.com/help/105399436216001
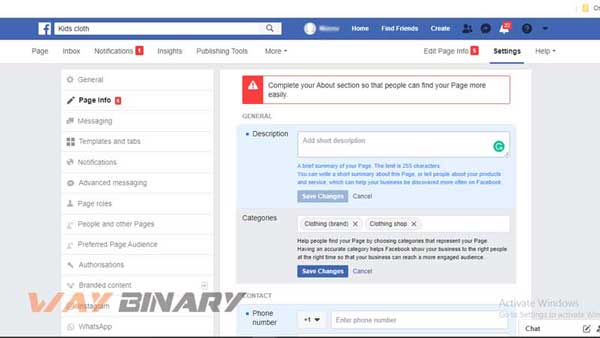
Step 4: Fill in the business details
The more you will be transparent, the better your business page will perform on Facebook. “Page Info” should not be skipped or left for later, as this imparts a direct impact on your page’s position. The Facebook page represents your business before the entire FB community and if the information is not appropriate to tell everything about your business, it gets hard to gain the attention of buyers or customers. For instance, the person who is searching for your page on FB might be looking forward to knowing your business phone number, so that direct contact could be established. So, if you don’t provide your number, working hours, etc, you may lose a number of leads.
Furthermore, to fill the details of your business on FB page, click on “Edit Page Info” from the top menu bar of your page and then, very comprehensively fill the asked information:
General information:
- Description: The description of your page should be comprehensive and within 255 characters. Make the best description within a few sentences so that it can deliver your message clearly and soundly. The description can be later expanded, we will tell you how.
- Categories: Remember we have already selected the main category previously, now we will add a few more categories so that your page can cover a large area and shows up to the potential audience. Don’t go, out-of-the league, add the categories that are good matches.
Contact Information:
- Phone number: You want people to reach you? Then don’t skip adding the phone numbers. Most people jump to this part as soon as they land on the page. So, make sure to add the active phone number so that you can convert visitors into customers when they call you.
- Website: If you have a website, adding to your Facebook page as you can kill two birds with one stone; it will increase your website traffic and increase the credibility of your business page.
- Email: People who can’t call, can reach you out via email. Ensure that you check your email address from time to time so that if anyone has contacted, you can revert to their emails.
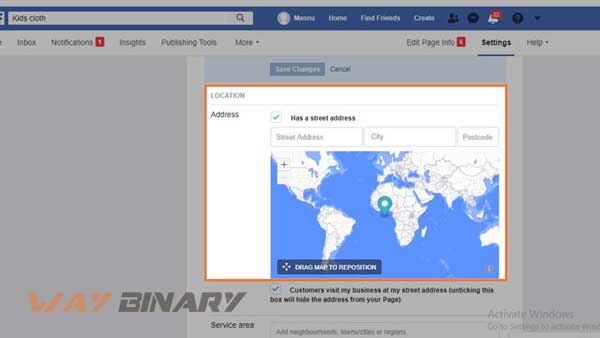
Location:
You can add the location of your physical storefront or office on the map. It is necessary that one must add the details of the service area so that only the people from the feasible area can contact you.
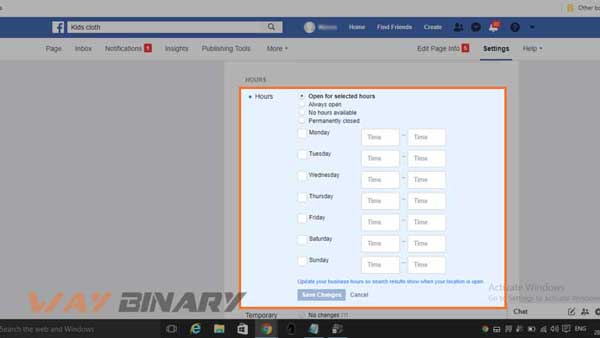
Hours of operation:
If you are available for a specific time and have the particular hours of operation, the visitors must know this so that they can contact you when you are available to them.
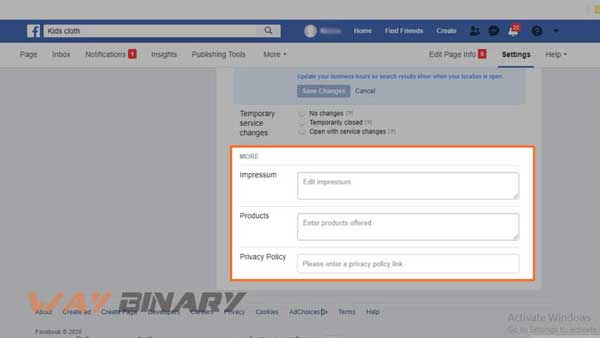
Additional options
Other information such as a statement of ownership that is known as Impressum, price range, products, and privacy policy can also be added, to give your page a professional look and feel.
Whenever you add something to a section, click on the “Save Changes” button to apply the changes.
Step 5: Create a Story
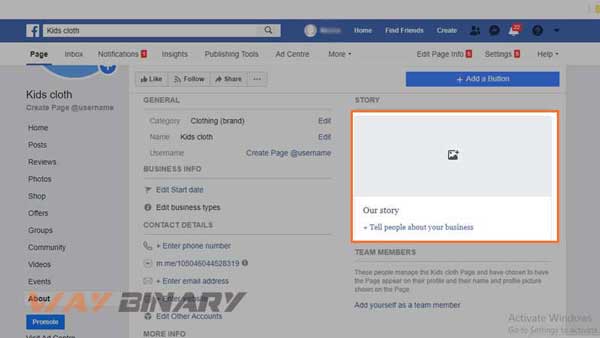
After filling all the important details for your business, you require a few more efforts. You need to tell your story, this will definitely increase the engagement of visitors. And, this will even make your page interesting and worth spending time on.
Facebook offers a fully-dedicated section to tell stories that can be a complete description of your business. To create stories, click on See more options, from the left-hand side menu, and then access the “About” section. Next, click on Our Story.
Now, write a long description you want and let the users know about the perks and features of your services. Make sure your story is very related to your product/brand/service/product. You can create expectations for your readers; interact with your viewers through story and give them reasons to choose you and stick to your services.
Start with a headline and then a text. Also, add the image for your post, and at last, click “Publish” to make the story live.
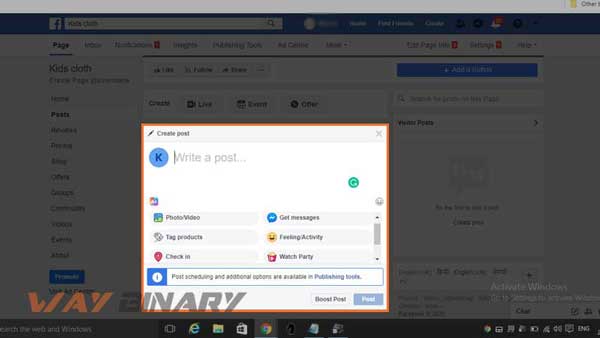
Step 6: Craft your first post
Content on your page holds a great value. Posting frequently is also a very useful practice to keep your audience intact. If you have genuine and interesting content on your page, the audience will spare more time on your page and even suggest others to like your page.
You can add images, quotes from some influencers, your business pictures, or your own thoughts. There are various types of posts you can make such as an event, check-ins, images, and more. The latest post will appear right on the top, whenever someone opens your business page.
Step 7: Publish your page and invite people:
Once you are done with all six steps, you can share your page online on various other platforms. Social sharing of your page will help you gain footfall on your Fb page, resulting in more profit. Make sure the users are comfortable contacting you and your page follows all the privacy guidelines determined by Facebook so that FB jail or disability of account can be avoided.
When the page is live, you need to increase the visibility of your Facebook page. Make sure you let everyone know about your newly created page. Use your personal Facebook account, Twitter account, WhatsApp, and other platforms to promote your Fb business page. Add the logos, and tools for people to subscribe or follow your page. Getting reviews also helps you to maintain a good position on Facebook.
Now it’s Time to Optimize Your Facebook Business Page:
Your Facebook page is now all set to give the wings to your business and ideas. But optimizing your page is equally important to get fruit from your efforts. The optimization planning is important to cope up with the competition and achieve your business goals through Facebook Marketing.
Here below is a quick-guide containing the most effective optimization strategies to grab the first place on the list of similar pages. Don’t miss even a single point, if you want to rule the Facebook business world.
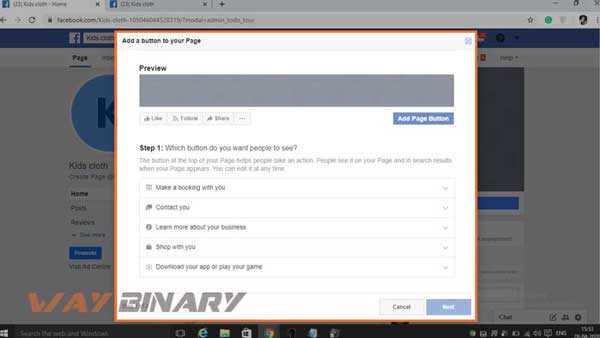
1) Create a Call-to-action button:
The Facebook page is a brilliant platform to fetch eyes, but what is the point of creating a page when there is no way to induce actions. The people coming to your page must get an option to know more about your business and this when the CTA or Call To Action button comes to the rescue.
They can stick around you, once they hit the button designed by you. Setting up the “Call to Action” button can help you redirect your audience to the business website or online store. The button you are adding should be describing the action you want your viewers to take, such as subscription, call, download the app, book appointment, visit the store, etc. The online audience can be easily transformed into real-life customers with just one CTA.
There are multiple CTAs available for each FB page and each option further adds various text options. Once set, click Next.
If you want to customize your CTA, you can try to get one as for some specific pages, Facebook offers the facility to provide the additional options.
Click on the Add Page button and select one option from the menu. After designing the CTA, click Finish and make it live.
2) Create a pinned post:
Pinned posts help you to share the critical information to every visitor who comes to view your page. This could be a promotional post, top-selling product, best content, or an urgent announcement. Just Pin the post and it will always appear on the top of all other posts.
As the pinned post always sticks to the top, just below the cover image. Make sure the pin-post is worth the place and it justifies its position so that all attention won’t go in the vein.
You can either create a new post or choose any already live post. For every post there are three dots on the right corner of the post, click Pin to Top of Page.
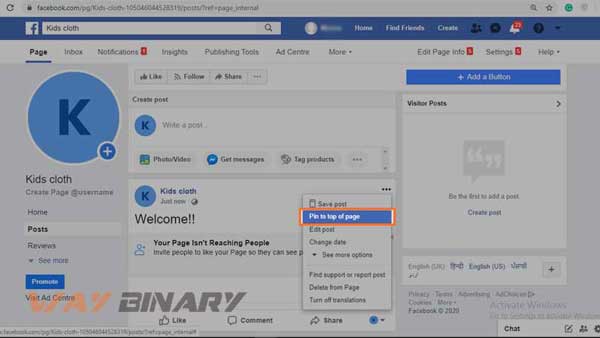
After pinning the post, a blue color pin-icon will appear on the right corner of the page.
Keep Reviewing the Settings:
The Facebook page settings are very important to focus on every major and minor detail. Once your page is visible to every member of the Facebook community, you need to determine who can administer the page, visibility of the posts, banning words for your page, etc. Also, it helps you control the comments, likes, and sharing of your page along with maintaining the security of your page.
The “Settings” option is good for your FB Business page as it helps you to keep an eye on every activity taking place on your page. Make it a daily routine to access and review the settings of your page so that the best management of the page can be ensured.
Access “Settings” and from the top-right corner of the page.
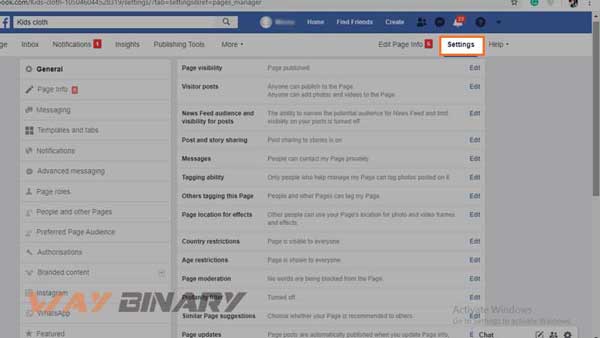
Go to Settings and choose all the preferences, you want to set. With the growth of your business, you need to be extra careful with the settings.
Review the Page Insights:
Facebook Page Insights is a very interesting and effective tool to collect the real-time details of the audience and their interest. Go to Insights from the top menu from the Facebook Business page.
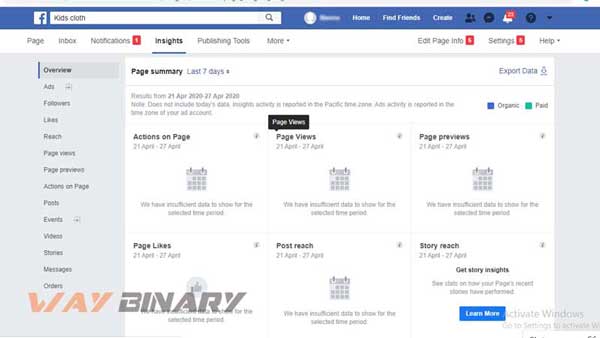
Insights will make you enable to evaluate the page’s overall performance. The demographic representation of the audience is all about the engagement and likes on the page. The metrics will help you to understand how, when, and from where you are getting the maximum audience. Even, you can track comments and reactions for a specific post and help you to improve the performance of the page for future reference.
Insight is the perfect way to see clicks on the call-to-action buttons, websites, phone numbers, and addresses. The data is well-refined on the basis of gender, age, country, city, and device. To access this information, click on “Actions on Page”.
Link Facebook Business page with other platforms:
We have talked about this earlier, the Facebook business page gives better results if connected with other platforms. This will also improve the audience flow from one platform to another and benefit all platforms at once.
You can add links to all your social accounts, blog posts, and websites to let users view them along with your Facebook business page.
The search engine ranking can also be improved with the inter-linking practice. Also, it is the key to master Facebook marketing.
Conclusion:
So, this was our guide to create, manage, and optimize the business page on Facebook. Growth is a never-ending process and to maintain your reputation and position on Facebook, you need to be consistent and active, else people will outrank you very easily. So, follow our tips and enjoy maximum success.

English Hons. From Cambridge University


