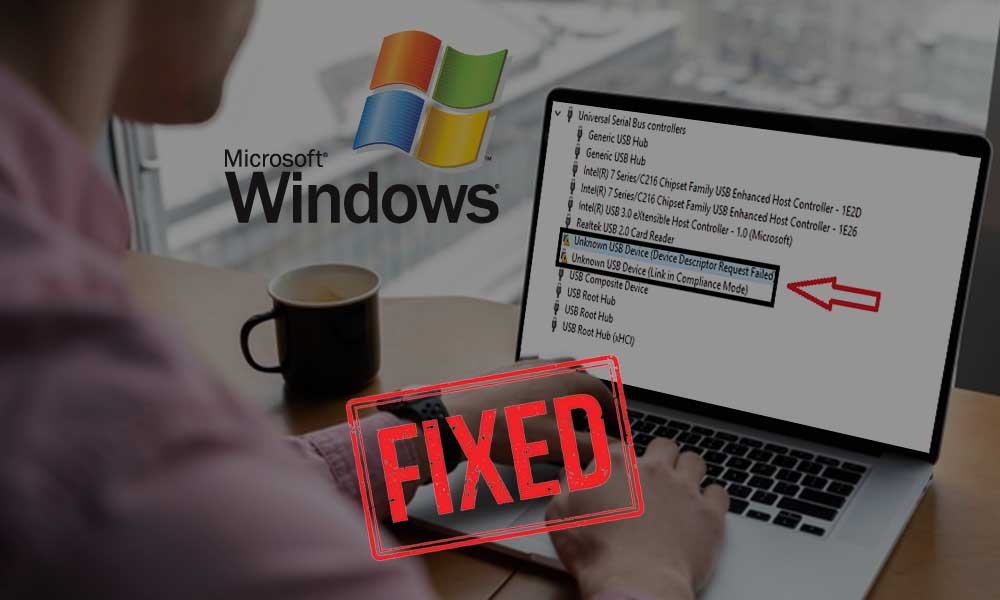
7 Major ways to fix the USB device descriptor failure issue for windows
With the updation of Windows 10 becoming more and more regular these days, users have been reporting issues whenever they try to connect a USB device on their computer, while a request for the USB device descriptor has failed pops up in your device manager.
If you ever encounter this error, it simply means that the computer is specifically telling you that it is unable to use the specific USB that is connected. “How do I fix this device descriptor that has failed?” is the question that arises now.
You simply need to read this blog to know-how about the fixes of this error without much fuss.
But before we begin, let us get to know what causes the unknown USB device (device descriptor request has failed) error in the first place.
Possible reasons behind the cause of this error
- It is quite possible that your latest software update had issues that ultimately ended up corrupting your USB drivers.
- A fault occurred while you were replacing some parts of your system.
- The port of the USB is broken.
- Some mistakes might have been made while you were configuring the settings of your system’s USB drivers.
- It might be possible that the USB drivers are corrupted or outdated.
- You may need to upgrade the BIOS system.
- It is quite possible that the USB device is damaged, corrupted, or maybe infected with malware.
Now that we know about some of the probable causes that may lead to this error, let us take a look at the simple methods that one can use to fix the USB/device descriptor failure issue.
Method 1- check for hardware issues
You may be unable to use your USB device because of some hardware issue which means that the problem is within your computer and not with the operating system. We have mentioned below two easy ways to test if it is the root cause of the problem as it can easily prove whether or not you need to look into getting your computer restored or you can simply go with the methods that are given below to fix the issues that originate from the system.
Plug Into a D+ifferent USB Port
You can try to use rear USB ports. If for some reason, your device starts working, then the USB port you are originally using may be broken. You should mark that port as not functional, or you should start looking for its replacement immediately.
Plug into a Different System
You can try to use the same hardware on a different system to check if the device itself has any issues. In case the hardware works fine on the different computers, it is likely possible that you are dealing with a system issue on your own in the first place. If the device still doesn’t work, chances are that it is broken which indicates that you will need a replacement.
Method 2- Plug out your power supply
Although it seems quite stupid, it is often seen that temporarily unplugging your power supply and then connecting the equipment that is causing the problem into your computer may help in fixing the unknown USB device issue on windows 10 with relative ease.
You need to disconnect all of the charging cables from your laptop up until your system is running on its integral battery backup. Once you are done, simply plug in the USB again to check if the system recognizes it.
If the error still exists and you were unable to solve it, then you can rule out the power supply as a probable cause for this issue. But if the USB starts working, then you need to look for a replacement for your charger.
Method 3- uninstall the USB driver in the device manager
Given below are the steps that one can use to uninstall the USB driver without much fuss.
- First off, press the windows+R keys simultaneously on your keyboard to open the run utility.
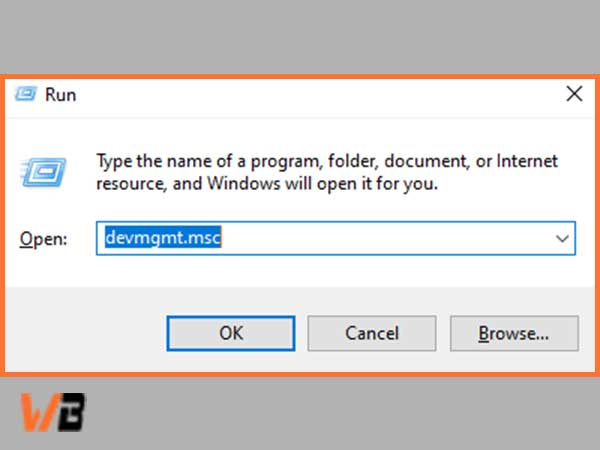
- After the run dialogue box appears on your screen, fill “devmgmt.Msc” without the quotation marks and then click on ok after you have entered it correctly. Doing so will launch the device manager in a different window.
- In the next window, you will need to expand the “universal serial bus controllers” section so to select the “unknown USB device (device descriptor request failed) from the list of options that appear on your screen.
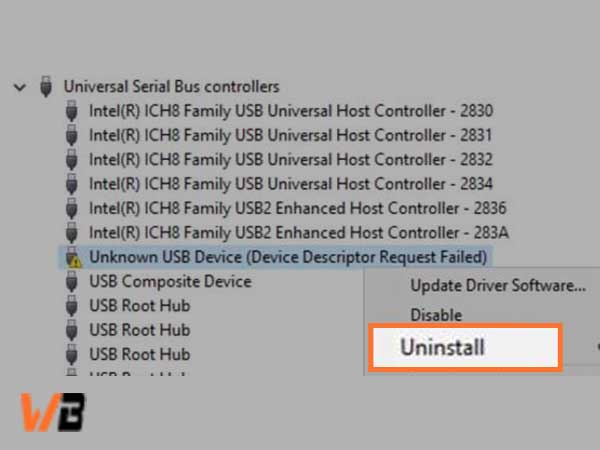
- Next, simply right-click on the USB device that you have selected and select uninstall from the context menu. Simply follow the instructions given on the screen to remove the device now.
- After the process of uninstallation is complete, you need to reboot your computer or laptop. This further will automatically reinstall the device correctly which can simply help you to get rid of the error that you have been facing recently.
Method 4- Disable the fast Startup section
Carry out the steps mentioned below to disable the start-up section with relative ease.
- Press and hold windows+R keys together to bring up the Run utility on your screen, to begin with.

- From the run dialogue box, you will need to type “control”, removing the quotation marks, and click on ok to proceed further. Doing so will launch the control panel in a different window. Make sure that you do not confuse this app with the new settings.
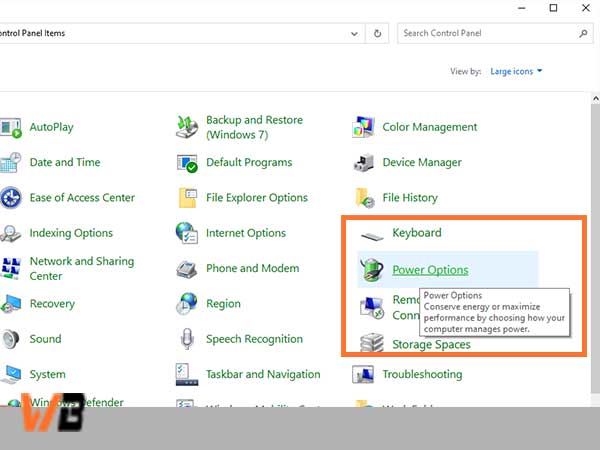
- In the next window, start by changing your view mode to large icons from the right-hand corner of your screen and then select the “power items” option from the list that appears on your screen.
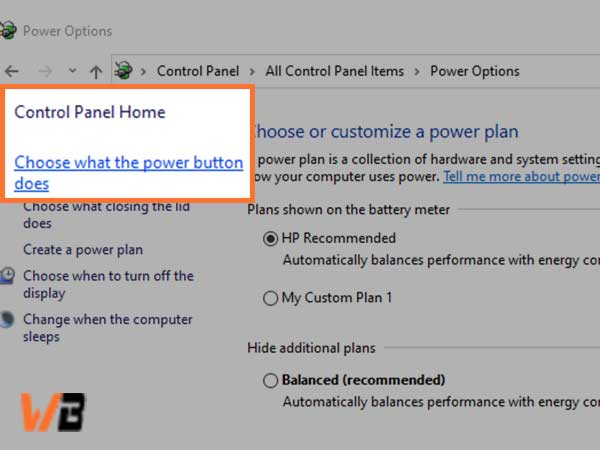
- Now, simply click on the “Choose what the power buttons do” link that is available on the top left corner of your screen.
- After that hit the link that says “change settings that are currently unavailable”. You will need to give administrative permission for this step which may even mean that you need to enter your admin password.
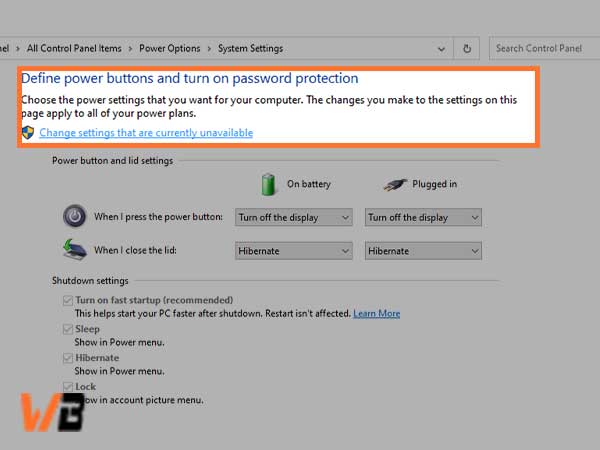
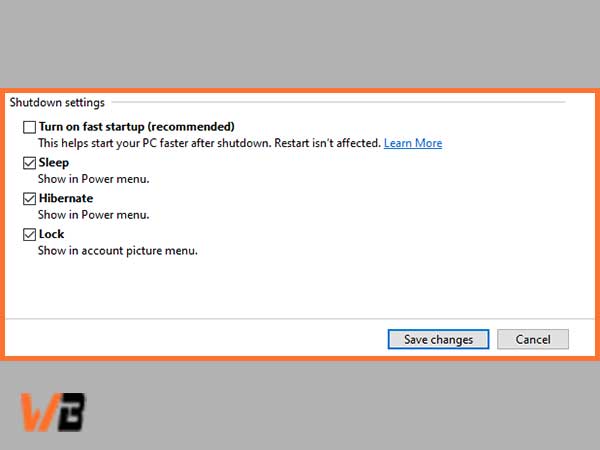
- For the next tab, you will need to look under the shutdown settings section of the tab. Keep in mind that the box next to “turn on fast startup (which is recommended) is not ticked. In case it is ticked, remove it to move forward. Save the changes made by you by clicking on save and then restart your device to finish.
Method 5-remove the USB and scan for hardware changes
The steps mentioned below can be used to carry out this method.
- You will need to use the steps given in method 1 to uninstall the USB device that is causing problems.
- Next, stay put in the device manager.
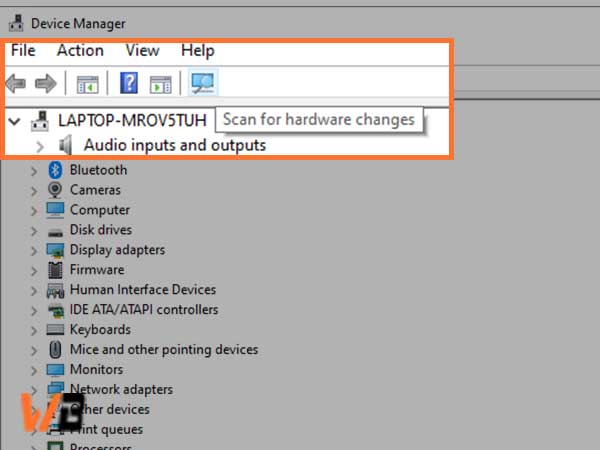
- Direct yourself to the header menu and click on the action and from that section, choose “scan for hardware changes”, which is the last icon as shown in the image below.
- Now, you will need to wait a bit while the system recognizes all of the hardware changes, and then plug in your USB again to check if it works now or not.
Method 6-Try to run the hardware and the device troubleshooter
- Open the settings of your system by pressing the windows+I key together or you can simply click on the start button from the icons available on your screen.
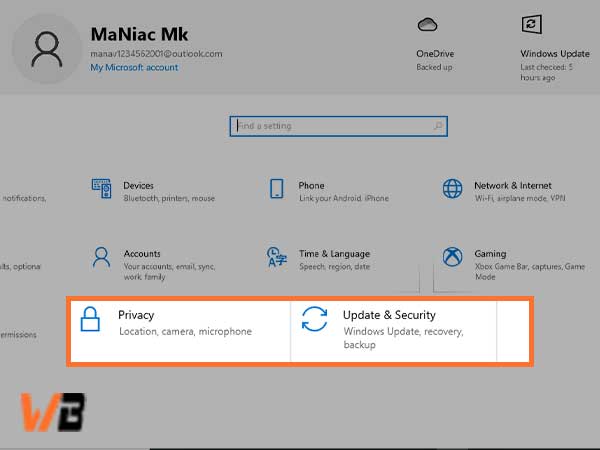
- There, you will need to choose the “update and security” tab.
- From there, find and click on the “troubleshoot” option that is available on the left side of your screen.
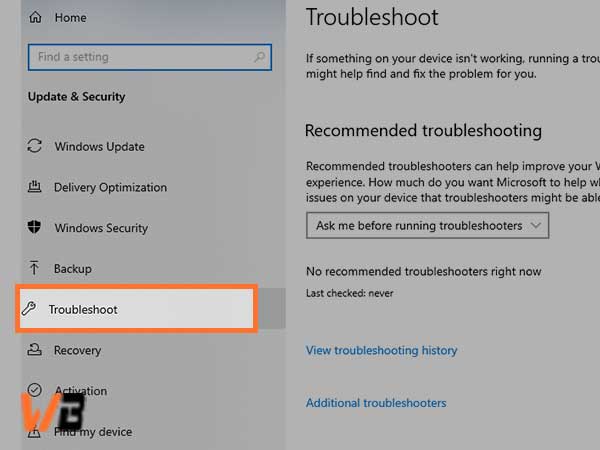
- In there, you will need to look for the hardware and devices troubleshooter option, simply click on it with your mouse and select “run the troubleshooter”.
- Next, you will simply need to follow the instructions given on the screen to check for any visible issues with your USB port or any other related hardware. In case anything gets picked up, you can either get more information about the error or you can select the correct course of action to fix this error.
Method 7- Change the USB selective suspend setting
Let us go through the steps of this method to execute it correctly.
- Press and hold windows+R keys simultaneously on your keyboard to open the run utility, to begin with.
- On the dialogue box, fill “control” without the quotation marks and then click on ok. Doing this will launch the classic control panel in a different window. (Make sure to not confuse the app with the new settings).
- Next, simply change your view mode to “large icons” from the top right corner of your screen and then choose “power options” from the list of items that appear on your screen.
- Now, select the “Show additional plans” option to reveal the hidden section.
- For the next step, choose the link that says “change settings that are currently unavailable”. To do so, you will need to give administrative permission which may also mean that you need to enter your admin password.
- Simply choose the high-performance plan and then click on the link that says “change plan settings”. Once you are done, click on the “change advanced power settings” option.
- Next, proceed further by clicking on the link that says “change settings that are currently unavailable”. Admin password confirmation will be required for this step again.
- Now, find and expand the USB settings. In this section, choose the “USB selective suspend” setting and keep in mind to disable the “on battery” and the “plugged in” option as well.
All you have to do is to restart the computer after clicking ok to finish the process.
These are some of the best methods that one can use to fix this error with relative ease.
Conclusion
This error can occur generally in windows 10 and one can use the methods mentioned above to fix the “unknown USB device (device descriptor request failed) error, be it for a touch-screen enabled laptop or the conventional computer.
These steps can help you to simply establish a functioning USB connection to your computer without any errors or issues popping up.

Web Expert (Social Media, Internet)
- Possible reasons behind the cause of this error
- Method 1- check for hardware issues
- Method 2- Plug out your power supply
- Method 3- uninstall the USB driver in the device manager
- Method 4- Disable the fast Startup section
- Method 5-remove the USB and scan for hardware changes
- Method 6-Try to run the hardware and the device troubleshooter
- Method 7- Change the USB selective suspend setting
- Conclusion


